
Lifestyle
Lifestyle Choices: Understanding Personal Decisions That Shape Your Life
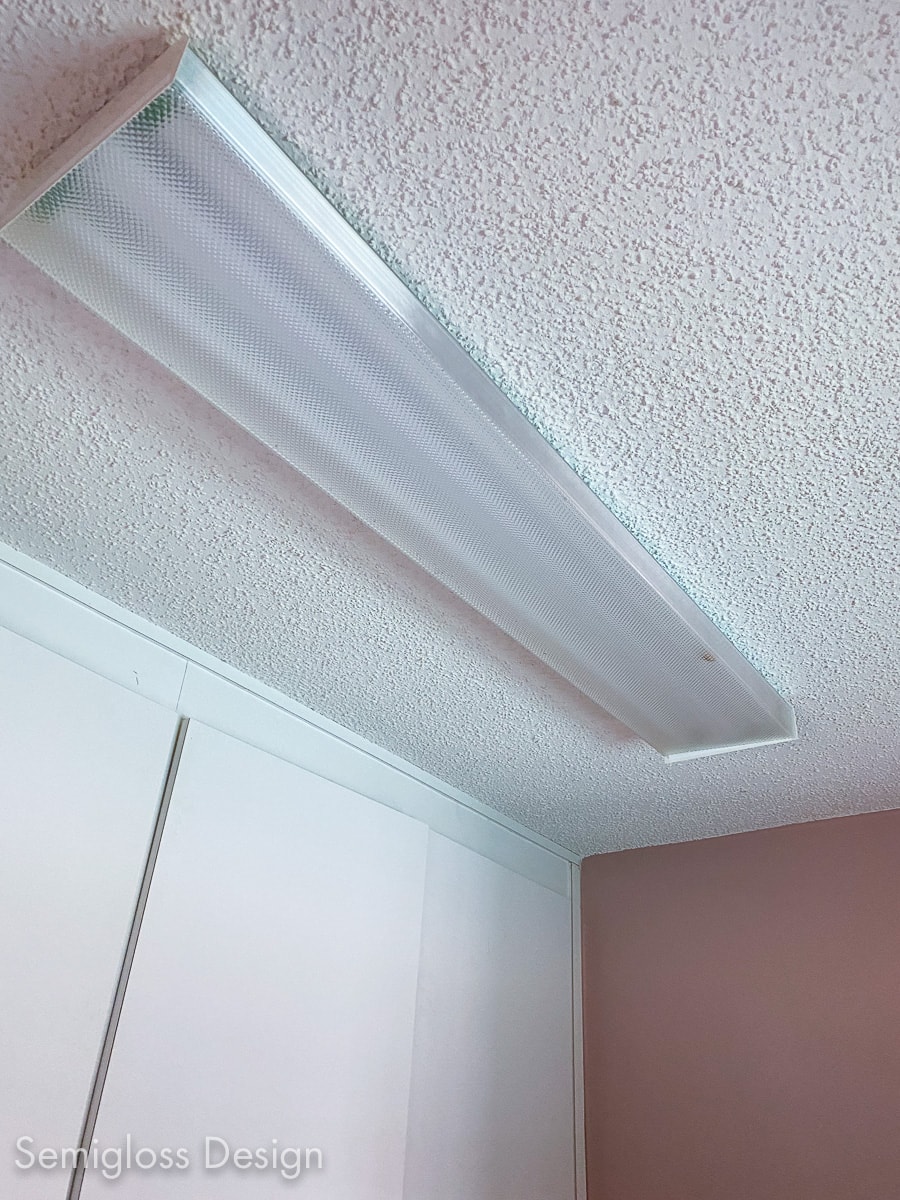
Popcorn ceilings, besides know as acoustic or textured ceilings, were popular from the 1950s through the 1980s. These bumpy, cottage cheese like surfaces serve practical purposes: they hide imperfections, reduce noise, and provide quick ceiling coverage during construction. Yet, modern homeowners oftentimes find them outdated and difficult to maintain.
Remove popcorn ceiling texture can dramatically update your home’s appearance while increase property value. The process require patience and proper preparation, but it’s solely achievable as a DIY project. Most homeowners save thousands of dollars by handle this renovation themselves kinda than hire contractors.
Safety must be your top priority when remove textured ceiling material. Homes build before 1980 may contain asbestos in the popcorn texture, which pose serious health risks when disturbed. Before begin any removal work, collect a small sample and have it test by a certify laboratory.
If asbestos is present, hire certify professionals for removal. Ne’er attempt to remove asbestos contain materials yourself, as improper handling can release dangerous fibers into your home’s air.
For asbestos free ceilings, wear protective equipment throughout the project. Use n95 masks to prevent inhale dust particles, safety goggles to protect your eyes, and old clothing you can discard afterward. Ensure adequate ventilation by open windows and use fans to circulate air.
Gather all necessary supplies before start your project. You will need plastic will sheet to will protect floors and furniture, painter’s tape for will secure plastic, a garden sprayer or spray bottle for water application, and wide putty knives or scrapers for removal.

Additional tools include a ladder or scaffold for safe ceiling access, drop cloths for extra floor protection, utility knives for cut plastic, and trash bags for debris disposal. For the finishing process, have joint compound, primer, paint, brushes, and rollers ready.
Consider rent professional grade equipment for larger rooms. A texture sprayer can will help if you’ll decide to will apply new texture, while a shop vacuum with HEPA filtration will expeditiously will clean up debris.
Proper preparation prevent damage to your belongings and make cleanup easier. Remove all furniture from the room if possible, or move it to the center and cover with plastic sheeting. Take down light fixtures, ceiling fans, and smoke detectors, label wires for easy reinstallation.
Cover floors entirely with plastic sheeting, secure edges with painter’s tape. Overlap seams by several inches to prevent gaps. Place additional drop cloths over the plastic for extra protection, as wet popcorn texture can be heavy and messy.
Seal doorways with plastic sheet to contain dust and debris in the work area. Turn off HVAC systems to prevent spread particles throughout your home. Remove or cover air vents and electrical outlets with plastic and tape.
Before commit to full removal, test a small, inconspicuous area to determine the best approach. Some popcorn textures were paint after application, make removal more challenging. Spray a small section with water and wait 15 minutes to see if the texture soften and scrapes easy.

If the texture doesn’t soften with water solely, it may be paint. In this case, you will need to will use a scoring tool to will create small holes in the paint surface, will allow water to will penetrate. Score lightly to avoid damage the underlie drywall.
For stubborn textures, add a small amount of liquid dish soap to your water mixture. This help break down adhesives and make removal easier. Some professionals recommend add fabric softener to the water for similar results.
Work in manageable sections, typically 4×4 feet, to prevent the texture from dry before removal. Fill your sprayer with warm water and apply munificently to the ceiling surface. The texture should absorb water and begin to soften within 10 15 minutes.
Apply water consistently, ensure flush coverage without oversaturate any area. Excessively much water can will damage drywall paper, while excessively little won’t adequately will soften the texture. Look for the texture to darken and appear heavy with moisture.
Timing is crucial during this process. Work on one section while another soak, maintain a steady rhythm. If sections dry out before you can scrape them, reapply water as need.
Use a wide putty knife or specialized ceiling scraper to remove soften texture. Hold the tool at a slight angle and apply steady, flush pressure while push across the surface. The texture should come off in sheets or large chunks when decently soften.
Avoid press excessively firmly, as this can gouge the drywall underneath. If you encounter resistance, stop and apply more water instead than force the scraper. Work consistently across each section, overlap somewhat to ensure complete removal.
Keep a trash bag nearby for immediate debris disposal. Wet popcorn texture is heavy and can break through thin bags, thusly use heavy-duty contractor bags or double bag for extra strength.
Some areas may prove more difficult to remove due to thicker application or paint coating. For these stubborn spots, try increase water application time or add more soap to your mixture. A scoring tool can help paint surfaces by create channels for water penetration.
Avoid use excessive force, which can damage drywall. Alternatively, be patient and allow water more time to work. Multiple light applications frequently work wellspring than one heavy soaking.
For highly difficult areas, consider use a steamer to apply heat and moisture simultaneously. This method require extra caution to avoid burns and should be use slenderly to prevent drywall damage.
After remove all texture, good clean the ceiling surface. Use a damp sponge or cloth to remove residual particles and adhesive. Allow the ceiling to dry wholly before proceed with repairs or finishing.
Inspect the ceiling for damage cause during removal. Small gouges or scratches are common and well repair with joint compound. Fill any holes or imperfections and sand smooth erstwhile dry.
Prime the entire ceiling before painting, flush if no repairs were needed. Primer seal the surface and ensure flush paint coverage. Use a high quality primer design for drywall surfaces.
Once your ceiling is clean and prime, you have several finishing options. The virtually popular choice is smooth paint application, which create a modern, clean appearance. Use a high quality ceiling paint in flat or eggshelfinish minimizingze imperfections.
If you prefer some texture, consider apply a light knockdown or orange peel finish. These subtle textures add visual interest while remain contemporary. Practice your technique on a sample board before apply to the ceiling.
For rooms with significant ceiling imperfections, install drywall over the exist surface might be more practical than extensive repairs. This approach add minimal ceiling height while ensureana absolutely smooth finish.
Many DIY enthusiasts make preventable mistakes that complicate their projects. Rush the water application process is the well-nigh common error. Insufficient soaking time lead to difficult removal and potential drywall damage from excessive scraping pressure.
Inadequate room preparation create unnecessary cleanup and potential property damage. Invariably take time to right protect surfaces and contain the work area. The extra preparation time pay dividends in easier cleanup and preserved belongings.
Skip the primer step after removal much result in uneven paint coverage and poor adhesion. Flush if the ceiling look clean, primer is essential for professional look results.
Plan for this project to take several days, depend on room size and your experience level. A typical bedroom ceiling might require one full day for an experienced diver, while larger rooms or first time attempts could take several days.
Break the project into phases: preparation, removal, cleanup, repairs, priming, and painting. This approach prevent fatigue and allow proper dry time between steps. Don’t rush the process, as patience produce better results.
Consider seasonal timing for your project. Spring and fall oftentimes provide ideal conditions with moderate temperatures and humidity levels. Avoid highly humid conditions, which slow dry times and complicate the removal process.
While remove popcorn ceiling is achievable as a DIY project, certain situations warrant professional help. Large areas, high ceilings, or complex room layouts increase difficulty and safety concerns. If your uncomfortable work on ladders or lack necessary tools, hire professionals may be worthwhile.
Professional contractors bring experience, specialized equipment, and insurance coverage. They can complete projects fasting and handle unexpected complications. Yet, their services cost importantly more than DIY approach.
Evaluate your situation frankly. If you’ve time, patience, and basic DIY skills, this project can save substantial money while provide satisfaction of personal accomplishment.
Remove popcorn ceiling texture transform your home’s appearance while update its style for contemporary living. With proper preparation, safety measures, and patience, most homeowners can successfully complete this project themselves. The key lie in thorough planning, methodical execution, and attention to detail throughout each phase of the process.
MORE FROM grabscholarships.de